Featured post

Maximize LastPass Security with a Yubikey

While LastPass is very convenient and I want to be as cautious as possible when putting all of my eggs (passwords) in one basket. I have two factor authentication enabled has native YubiKey support as a second authentication factor

Protections:

  • LastPass Premium – alows simple use of unique passwords for each account
  • Typed/Remembered Password – protects from a stolen YubiKey allowing access to your vault
  • YubiKey OTP – Prevents a keylogger from allowing access to your LastPass Vault
  • YubiKey Static Password – ensures your Master Password is strong enough to prevent an attacker from brute forcing your password if they are able dump the LastPass database

What you need:

Setup Your YubiKey

YubiKey Programming Dialog

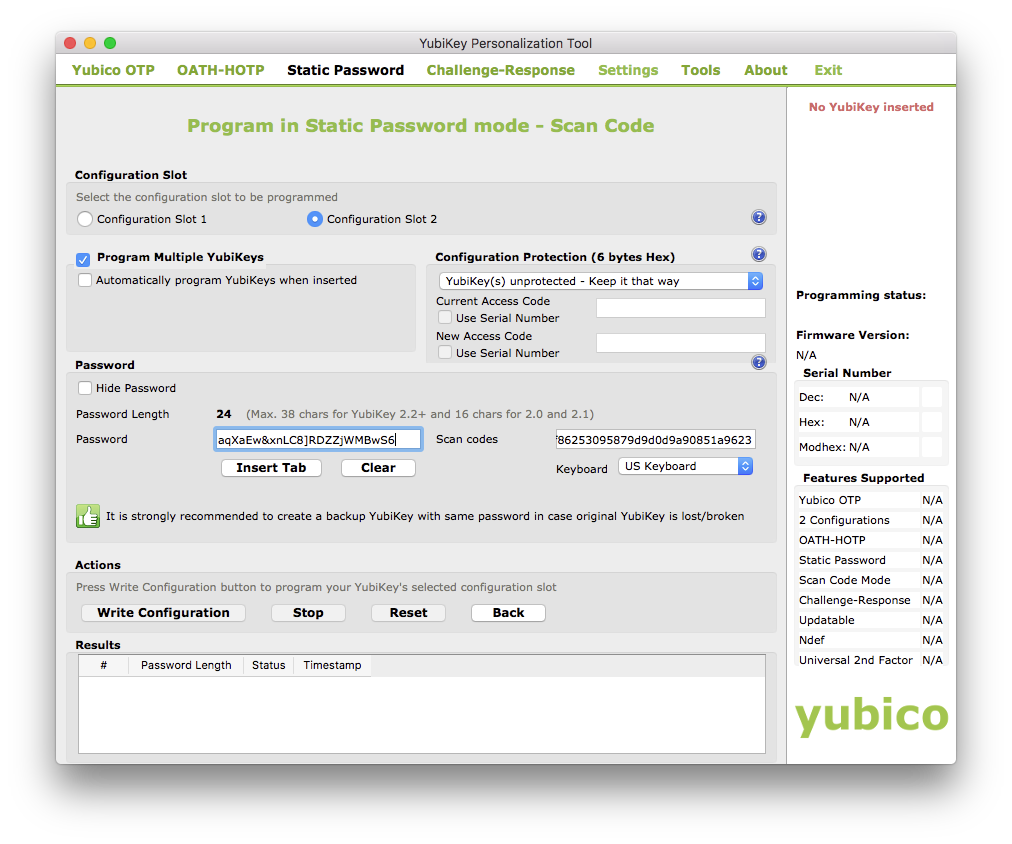
YubiKey Programming Dialog (not my real password)

  1. Launch the YubiKey Personalization Tool
  2. Select "Static Password Mode"
  3. Click the "Scan Code" button
  4. Select:
    • Configuration Slot 2
    • Program Multiple YubiKeys
    • Keyboard: US Keyboard
  5. Enter a stong password
  6. Insert each YubiKey, and click "Write Configuration"

Configure LastPass

Add YubiKeys to LastPass

Add YubiKeys to LastPass

  1. Open your LastPass Vault and Click Account Settings
  2. If you have not already configured your Yubikey as a second factor
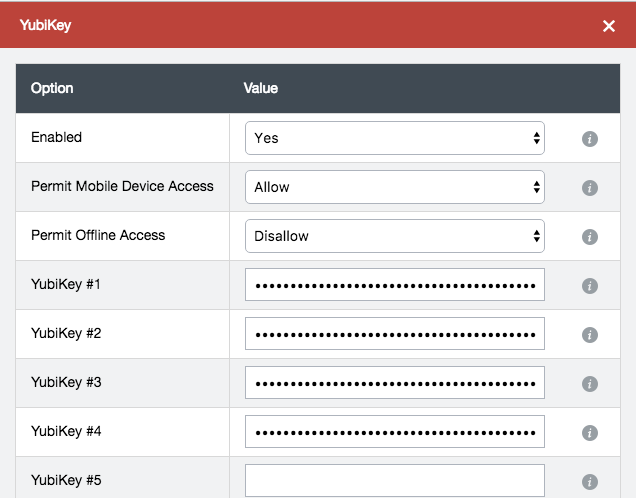
    1. Click Multifactor Options, Scroll down to yubico, Click the pencil
    2. Set Enabled to Yes
    3. If you use iOS, you will want to set Permit Mobile Device Access to Allow, even though it is slightly less secure
    4. Pick which ever option you like for Permit Offline Access. Since you should only be loging in to LastPass from trusted computers, there not much of a security risk
  3. For each of your YubiKeys, put the cursor in a YubiKey box and press the button on the YubiKey
  4. When all of your YubiKeys have been entered, click Update
  5. Under the General tab, Change Master Password. For your new master password, type a good password (it can be your current password), followed by the password in your YubiKey. This is the only time you will have to type the YubiKey password.

Use

Now when you log into LastPass, you will type your password, insert your YubiKey, press the YubiKey button for 2 seconds. The YubiKey will type its portion of your master password and <enter>. LastPass will prompt you for your second factor. Use a short press on the YubiKey button to enter the YubiKey OTP code.

Mobile Protection

Since my iPhone SE is not compatible with YubiKeys, I had to take a different approach. This one phone is the only mobile device allowed to access my account (restricted by UUID). I authorized it using the Google Authenticator app before disabling Google Authenticator. My phone is protected by TouchID and the LastPass app is protected by a PIN. I store the "YubiKey portion" of my master password in NoteCrypt which is proteced by a different/shorter password.

NoteCrypt https://itunes.apple.com/tc/app/notecrypt-encrypted-notes/id897154139 which appears to be developed by Tom King (LinkedIn). While I can’t audit what NoteCrypt actually does, it says all of the right things about encryption and password based key derivation. It also costs $2.99, so there is an economic model that doesn’t involve ads or selling of user data. Finally, the developer’s LinkedIn profile looks respectable.

Dnsmasq Isn’t Responding to All Queries

If you have a Dnsmasq server that isn’t responding to all DNS queries, it’s likely your distro (or you) set the local-service option. I assume this is to prevent servers from contributing to a DDoS attack or leaking network information; however, this setting is very restrictive and limits responses to the local subnet(s).

If you have a network with a few different subnets, you’ll need to disable this option. Please ensure your firewall is appropriately configured before proceeding.

local-service may be specified in the /etc/dnsmasq.conf file or as a command line parameter when the Dnsmasq is started. On Debian, the command line parameter is added when Dnsmasq is started by /etc/init.d/dnsmasq.

The simple solution is to add

interface=*

to /etc/dnsmasq.conf, because the interfaceexcept-interfacelisten-address, and auth-server options all cause local-service to not have an effect.

Minimal dnscrypt-proxy DoH Config

dnscrypt-proxy has a lot of features and can be intimidating to setup. Issues range from understanding what dnscrypt is to how to pick list of sources to understanding what a stamp is.

While it’s not a recommended configuration, I wanted to setup a very simple/minimal dnscrypt-proxy that uses a few well known DoH servers.

Steps

  1. Install dnscrypt-proxy.
  2. Edit the configuration file (/etc/dnscrypt-proxy.toml or /etc/dnscrypt-proxy/dnscrypt-proxy.toml on Linux/UNIX systems).
    1. Delete or comment out server_names
      # server_names = ['scaleway-fr', 'google', 'yandex', 'cloudflare']
    2. Delete or comment out the entries under [sources]
      [sources]
    3. If present, ensure doh_servers = true
    4. Depending on the servers you configure, you might need to edit require_dnssec, require_nolog, and require_nofilter to be compatible with the servers. Since I’m explicitly configuring a small list of servers, it’s easier to turn off all restrictions
      require_* = false
    5. Add your desired servers to the [static] section (for this you should get a basic understanding of stamps)
      static entry
      Note: each static entry requires a unique name.

Stamps

While you don’t need a detailed understanding of stamps, it’s good to have a basic understanding; so you can audit the servers you are adding and you can add custom servers.

A stamp is just dnscrypt-proxy’s format for encoding all relevant parameters for a DNS server. For a DoH server, that consists of:

  • Properties (required) – flags indicating if the server is DNSSEC capable, logs queries, or filters results.
  • IP address (optional) – If an IP address is not provided the Host will be used.
    Note: The spec says the port (if not 443) should be provided in this field; however, the public lists and the stamp calculator include the port in the Host field
  • Host (required) – self-explanatory
  • Hashes (optional) – doesn’t appear to be working. This should allow trusting custom cert chains; however, dnscrypt-proxy is only using the platform’s trust store to validate certificate chains.
  • Path (required) – for DoH servers this is generally “/dns-query”. This should be well documented with the information about each DoH server.

You have three options:

  1. Generate your own stamps using the stamp calculator
  2. Use stamps below
  3. Copy stamps from a public list:

For any pre-generated stamps, you can check the contents by pasting the stamp into to Stamp field of the stamp calculator.

DoH Server Stamps

Some stamps for common DoH servers. While I have verified these stamps work, I make no claim to the accuracy of the properties.

Quad9

Ref: https://quad9.net/doh-quad9-dns-servers/

Properties: DNSSEC, Filter (malicious domain blocking), No Logging (limited per the Quad9 FAQ):

# Quad9 Secured 9.9.9.9 DoH
[static.'quad9-doh-ipv4-filter-pri-1']
stamp = 'sdns://AgMAAAAAAAAABzkuOS45LjkADmRuczkucXVhZDkubmV0Ci9kbnMtcXVlcnk'

# Quad9 Secured 149.112.112.9 DoH
[static.'quad9-doh-ipv4-filter-pri-2']
stamp = 'sdns://AgMAAAAAAAAADTE0OS4xMTIuMTEyLjkADmRuczkucXVhZDkubmV0Ci9kbnMtcXVlcnk'

# Quad9 Secured 2620:fe::9 DoH
[static.'quad9-doh-ipv6-filter-pri-1']
stamp = 'sdns://AgMAAAAAAAAADFsyNjIwOmZlOjo5XQAOZG5zOS5xdWFkOS5uZXQKL2Rucy1xdWVyeQ'

# Quad9 Secured 2620:fe::fe:9 DoH
[static.'quad9-doh-ipv6-filter-pri-2']
stamp = 'sdns://AgMAAAAAAAAAD1syNjIwOmZlOjpmZTo5XQAOZG5zOS5xdWFkOS5uZXQKL2Rucy1xdWVyeQ'

Properties: DNSSEC, No Filter, No Logging (limited per the Quad9 FAQ):

# Quad9 Unsecured 9.9.9.10 DoH
[static.'quad9-doh-ipv4-nofilter-pri-1']
stamp = 'sdns://AgMAAAAAAAAACDkuOS45LjEwAA9kbnMxMC5xdWFkOS5uZXQKL2Rucy1xdWVyeQ'

# Quad9 Unsecured 149.112.112.10 DoH
[static.'quad9-doh-ipv4-nofilter-pri-2']
stamp = 'sdns://AgMAAAAAAAAADjE0OS4xMTIuMTEyLjEwAA9kbnMxMC5xdWFkOS5uZXQKL2Rucy1xdWVyeQ'

# Quad9 Unsecured 2620:fe::10 DoH
[static.'quad9-doh-ipv6-nofilter-pri-1']
stamp = 'sdns://AgMAAAAAAAAADVsyNjIwOmZlOjoxMF0AD2RuczEwLnF1YWQ5Lm5ldAovZG5zLXF1ZXJ5'

# Quad9 Unsecured 2620:fe::fe:10 DoH
[static.'quad9-doh-ipv6-nofilter-pri-2']
stamp = 'sdns://AgMAAAAAAAAAEFsyNjIwOmZlOjpmZToxMF0AD2RuczEwLnF1YWQ5Lm5ldAovZG5zLXF1ZXJ5'

Cloudflare DNS

Ref: https://developers.cloudflare.com/1.1.1.1/1.1.1.1-for-families

Properties: DNSSEC, Filter (malicious content blocking), No Logging (limited per Privacy):

# Cloudflare Security 1.1.1.2 DoH
[static.'cloudflare-doh-ipv4-filter-pri-1']
stamp = 'sdns://AgMAAAAAAAAABzEuMS4xLjIAG3NlY3VyaXR5LmNsb3VkZmxhcmUtZG5zLmNvbQovZG5zLXF1ZXJ5'

# Cloudflare Security 1.0.0.2 DoH
[static.'cloudflare-doh-ipv4-filter-pri-2']
stamp = 'sdns://AgMAAAAAAAAABzEuMC4wLjIAG3NlY3VyaXR5LmNsb3VkZmxhcmUtZG5zLmNvbQovZG5zLXF1ZXJ5'

# Cloudflare Security 2606:4700:4700::1112 DoH
[static.'cloudflare-doh-ipv6-filter-pri-1']
stamp = 'sdns://AgMAAAAAAAAAFlsyNjA2OjQ3MDA6NDcwMDo6MTExMl0AG3NlY3VyaXR5LmNsb3VkZmxhcmUtZG5zLmNvbQovZG5zLXF1ZXJ5'

# Cloudflare Security 2606:4700:4700::1002 DoH
[static.'cloudflare-doh-ipv6-filter-pri-2']
stamp = 'sdns://AgMAAAAAAAAAFlsyNjA2OjQ3MDA6NDcwMDo6MTAwMl0AG3NlY3VyaXR5LmNsb3VkZmxhcmUtZG5zLmNvbQovZG5zLXF1ZXJ5'

Properties: DNSSEC, No Filter, No Logging (limited per Privacy):

# Cloudflare DNS 1.1.1.1 DoH
[static.'cloudflare-doh-ipv4-nofilter-pri-1']
stamp = 'sdns://AgMAAAAAAAAABzEuMS4xLjEAEmNsb3VkZmxhcmUtZG5zLmNvbQovZG5zLXF1ZXJ5'

# Cloudflare DNS 1.0.0.1 DoH
[static.'cloudflare-doh-ipv4-nofilter-pri-2']
stamp = 'sdns://AgMAAAAAAAAABzEuMC4wLjEAEmNsb3VkZmxhcmUtZG5zLmNvbQovZG5zLXF1ZXJ5'

# Cloudflare DNS 2606:4700:4700::1111 DoH
[static.'cloudflare-doh-ipv6-nofilter-pri-1']
stamp = 'sdns://AgMAAAAAAAAAFlsyNjA2OjQ3MDA6NDcwMDo6MTExMV0AEmNsb3VkZmxhcmUtZG5zLmNvbQovZG5zLXF1ZXJ5'

# Cloudflare DNS 2606:4700:4700::1001 DoH
[static.'cloudflare-doh-ipv6-nofilter-pri-2']
stamp = 'sdns://AgMAAAAAAAAAFlsyNjA2OjQ3MDA6NDcwMDo6MTAwMV0AEmNsb3VkZmxhcmUtZG5zLmNvbQovZG5zLXF1ZXJ5'

Google DNS

Ref: https://developers.google.com/speed/public-dns/docs/doh

Properties: DNSSEC, No Filter, Logging (generally full logs are only temporary per the Privacy Statement):

# Google DNS 8.8.8.8 DoH
[static.'google-doh-ipv4-nofilter-1']
stamp = 'sdns://AgMAAAAAAAAABzguOC44LjgACmRucy5nb29nbGUKL2Rucy1xdWVyeQ'

# Google DNS 8.8.4.4 DoH
[static.'google-doh-ipv4-nofilter-2']
stamp = 'sdns://AgMAAAAAAAAABzguOC40LjQACmRucy5nb29nbGUKL2Rucy1xdWVyeQ'

# Google DNS 2001:4860:4860::8888 DoH
[static.'google-doh-ipv6-nofilter-1']
stamp = 'sdns://AgMAAAAAAAAAFlsyMDAxOjQ4NjA6NDg2MDo6ODg4OF0ACmRucy5nb29nbGUKL2Rucy1xdWVyeQ'

# Google DNS 2001:4860:4860::8844 DoH
[static.'google-doh-ipv6-nofilter-2']
stamp = 'sdns://AgMAAAAAAAAAFlsyMDAxOjQ4NjA6NDg2MDo6ODg0NF0ACmRucy5nb29nbGUKL2Rucy1xdWVyeQ'

Common Problems installing a Custom Certificate for RDP

There are a quite a few good guides for configuring your own CA signed certificate for RDP; however, details it’s easy to gloss over and most of the troubleshooting is buried in the comments:

  • Create an RDP certificate with an RSA key. The signing key of the CA does not matter.
  • Create an RDP certificate with the TLS (web) Server EKU, not the Remote Desktop EKU.
  • Add the certificate to the Personal certificate store, not the Remote Desktop certificate store.

Example errors:

Error log when using an RDP certificate with an ECDSA key.

An TLS 1.2 connection request was received from a remote client application, but none of the cipher suites supported by the client application are supported by the server. The TLS connection request has failed.
Schannel with an ECDSA certificate

Windows 10 and Remote Desktop 10 on macOS report an Unknown/Invalid EKU.

Unknown Key Usage
Unknown Key Usage on Windows 10

Set-WmiInstance error trying to use a certificate in the Remote Desktop certificate store.

Set-WmiInstance : Invalid parameter

WMIC error trying to use a certificate in the Remote Desktop certificate store.

wmic error: Description = Invalid namespace

Adding OIDs to XCA

Adding OIDs to XCA is a straightforward process. I was able to follow the official guide at https://hohnstaedt.de/xca-doc/xca-13.html with minimal issues.

First, ensure you download XCA v2.x from the official download page https://hohnstaedt.de/xca/index.php/download. The instructions didn’t make sense at first since I was running xca v1.4.1.

Create a file named “oids.txt” in the user’s XCA directory:

  • Windows: C:\Users\<username>\AppData\Roaming\xca
  • macOS: ~/Library/Application Support/data/xca
  • Linux: ~/.xca
C:\Users\Admin\AppData\Roaming\xca\oids.txt
oids.txt on Windows

Add the OID(s) to oids.txt using the format “<oid> : <short_name> : <long_name>”. In the example below, I added a (Microsoft) Remote Desktop Authentication OID (1.3.6.1.4.1.311.54.1.2):

1.3.6.1.4.1.311.54.1.2: rdpAuth: Remote Desktop Authentication
oids.txt content

Copy the eku.txt file from the XCA installation location to the user’s XCA directory:

  • Windows: C:\Program Files\xca
  • macOS: /Applications/xca.app/Contents/Resources
    This can be accessed through the command line or right clicking on the xca application and selecting “Show Package Contents”
  • Linux: /usr/share/xca or /usr/local/share/xca

Note: The whole file eku.txt file must be copied, because xca only parses the first eku.txt it encounters.

Add a line to the user’s eku.txt referencing your new EKU:

rdpAuth
Add the new EKU to the list of pre-defined EKUs

Close and re-open XCA and your new EKU will be available:

xca: Remote Desktop Authentication EKU
XCA Key Usage Tab

After adding the Remote Desktop Authentication EKU, I found out it is no longer supported/recognized. The Microsoft Remote Desktop 10 app on macOS and Windows 10 both report the EKU as invalid/unknown.

Unknown Key Usage
Unknown Key Usage

Blocking Windows Updates

To block Windows 10 Updates, block lookup of the following domains:

  • *.windowsupdate.microsoft.com
  • *.update.microsoft.com
  • *.windowsupdate.com
  • *.wustat.windows.com
  • *.ntservicepack.microsoft.com
  • *.stats.microsoft.com
  • *.mp.microsoft.com
  • *.data.microsoft.com
  • *.events.data.microsoft.com

This list differs from the lists I’ve been able to find published by Microsoft; notably stats.microsoft.com, mp.microsoft.com, and data.microsoft.com. I developed the list above by watching DNS queries while checking for updates and blocking domain names until the check for updates failed.

Since I’m using Dnsmasq, I’ve added a config file in /etc/dnsmasq.d/ so I can easily disable the blocking when I am ready to install updates:

address=/windowsupdate.microsoft.com/#
address=/update.microsoft.com/#
address=/windowsupdate.com/#
address=/wustat.windows.com/#
address=/ntservicepack.microsoft.com/#
address=/stats.microsoft.com/#
address=/mp.microsoft.com/#
address=/data.microsoft.com/#
address=/events.data.microsoft.com/#